
Example concrete slab plan, start to finish
Poured concrete pad with forms, gravel base, and rebar. This is a real output from the concrete slab calculator — nothing blurred, nothing withheld. Change any dimension and yours regenerates instantly. Estimates only, never a quote.
- Size
- 12×10 ft
- Thickness
- 4"
- Base
- 4"
- Concrete
- 1.48 cu yd
- Rebar
- 16" grid
- Pour type
- ready-mix
Scaled diagram
How to read this: the drawing is to scale but not to the inch. Always measure your real site before cutting — these are estimates only, not a construction document.
Full shopping list
Ready-mix concrete (delivered) 1.63 cu yd × $165 | $269 |
Crushed gravel base 1.63 cu yd × $40 | $65 |
6mil vapor barrier roll (10×25) 1 roll × $55 | $55 |
Form lumber (2×4 × 12') 5 ea × $8 | $40 |
Form stakes (wood, 24") 15 ea × $2 | $30 |
Foam expansion strip 44 ft × $1 | $31 |
Rebar #4 (16" grid) 229 ft × $1 | $126 |
| Incl. 10% waste ($50) | $616 |
Cut list
- Forms – long sides ×22×4 × 12'
- Forms – short sides ×22×4 × 10'
- Rebar – long runs ×9#4 × 12'
- Rebar – short runs ×10#4 × 10'
Before you start — do these four things
Measure twice, on site
Re-measure every dimension at the actual location and compare it to the numbers in this guide before you buy or cut anything.
Call 811 before you dig
Free, and required in most areas. Wait for the utility locates before any post hole, footing, or excavation.
Confirm permits and codes locally
Spans, footing depth, setbacks, and heights are set by your local building department — their answer overrides this guide.
Safety gear on, every step
Eye and ear protection, gloves, dust mask when cutting, and a helper for anything you can't lift alone.
Estimates only — verify measurements, prices, and codes locally. This guide is not a substitute for an engineer or your building official.
How the pros build this concrete slab
Excavate and compact, form and brace to line and grade, place reinforcement on chairs, pour, screed, float, and cure wet.
3+ people on pour day; forms one day, pour one day, cure days after
Tools a pro shows up with
- Safety glasses
- Work gloves
- Hearing protection
- Rubber boots
- Plate compactor
- Screed board
- Bull float
- Edger and groover
- Steel or magnesium trowel
- Wheelbarrows
The numbers pros work to
- Thickness4 in typical patio/walk; 5–6 in for vehicles
Load path — driveways see point loads a 4 in slab cracks under.
- Base4 in compacted granular base in lifts
The base, not the concrete, carries the load.
- SlopeAbout 1/8 to 1/4 in per foot away from structures
Positive drainage keeps water off foundations.
- Control jointsDepth 1/4 of slab thickness, spacing in feet ≈ 2–3× thickness in inches
Concrete will crack; joints decide where.
- CuringKeep continuously moist or covered for several days
Strength comes from hydration, not drying.
General guidance based on common residential practice. Your local building department has the final say — estimates only, never a quote or an engineered design.
Step 1: Excavate, base, forms
Nearly every slab failure starts under the concrete.
1.1 Strip topsoil and organics, then compact granular base in lifts.
Pro standard
Compact in shallow lifts with a plate compactor; test for pumping underfoot.
In plain English
Get rid of soft dirt, add gravel a few inches at a time, and pack each layer down hard.
1.2 Set forms to line and grade with stakes every 2–3 ft and build the drainage slope in.
Pro standard
String line to grade; brace forms against the head pressure of wet concrete.
In plain English
Wet concrete pushes hard. Stake the boards often, and tip them slightly so water drains away from the house.
Before you move on: Base compacted and uniform, forms straight, slope verified with a level and a tape.
Step 2: Reinforcement
Steel in the wrong place does nothing.
2.1 Place mesh or rebar on chairs at mid-depth or upper third — never on the ground.
Pro standard
Support on chairs; hooking mesh up during the pour is unreliable.
In plain English
The steel must float inside the concrete, not lie on the dirt. Little plastic stands hold it up.
2.2 Maintain concrete cover at all edges.
Pro standard
Cover protects steel from corrosion.
In plain English
Keep the steel a couple of inches in from every edge so it doesn't rust.
Before you move on: Steel supported at the right height, laps tied, cover maintained at every edge.
Step 3: Pour and finish
You get one window and it closes fast.
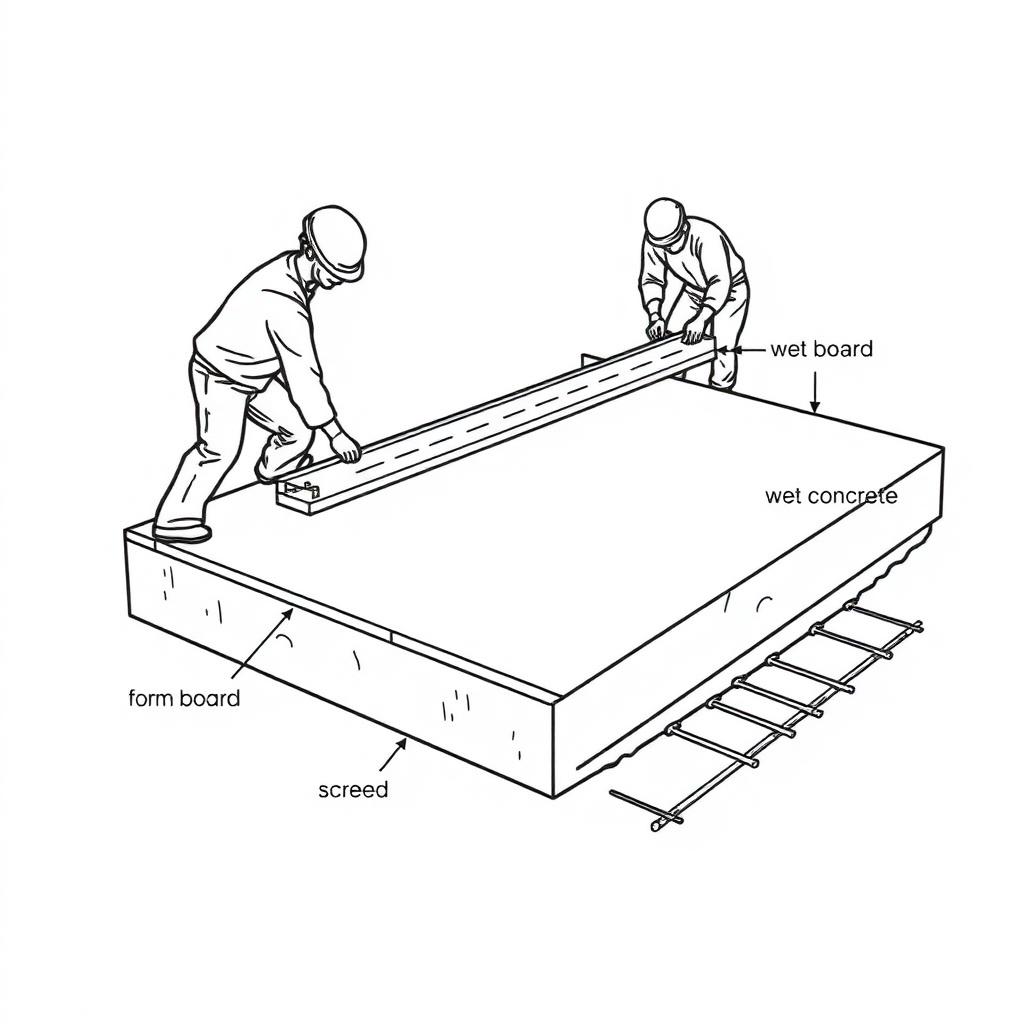
3.1 Place, screed to the forms, then bull float immediately.
Pro standard
Screed with a sawing motion; float before bleed water appears.
In plain English
Drag a straight board across the top to level it, then smooth with the big float right away.
3.2 Wait for bleed water to disappear, then edge, cut joints and final-finish.
Pro standard
Finishing while bleed water is on the surface causes scaling.
In plain English
Don't touch it while it's shiny and wet on top — you'll ruin the surface. Wait until the sheen is gone.
3.3 Broom finish for exterior slip resistance.
Pro standard
Texture perpendicular to the direction of travel and drainage.
In plain English
Drag a broom across for grip — smooth outdoor concrete is dangerous when wet.
Before you move on: Surface uniform, joints cut to depth, slope holds water nowhere, texture consistent.
Step 4: Cure and protect
This is the cheapest strength you will ever buy.
4.1 Keep the slab wet or covered with curing compound/plastic for several days.
Pro standard
Continuous moisture during early hydration; protect from freezing and hot sun.
In plain English
Keep it damp. Concrete hardens by a chemical reaction with water, not by drying out.
4.2 Stay off with vehicles until it reaches strength.
Pro standard
Foot traffic in a day or so; vehicle loads much later.
In plain English
Walk on it after about a day, but keep cars off for a few weeks.
Before you move on: Curing maintained daily, no early loading, edges undamaged when forms come off.
What goes wrong most often
- Pouring on soft, uncompacted or frozen ground.
- Laying mesh flat on the base so it does nothing.
- Troweling bleed water back into the surface — leads to scaling and dusting.
Permit checkpoints
- Set your state for localized rules
Permit thresholds, frost-line depth, and fence-height caps vary a lot by state. Pick your state above to tailor this checklist.
- Call 811 before excavating
You're removing 8+ inches of dirt (slab + gravel). Utilities within 24" of the surface are common. Required by law before digging.
- Confirm setback rules apply
Concrete pads count as impervious surface — many municipalities restrict how close they can be to property lines and how much yard can be paved.
- Slope 1/8" per foot away from house
Standard drainage pitch. A perfectly level slab pools water; too much slope and furniture wobbles.
- Consider a thickened edge for cold climates
In freeze/thaw zones, thicken the perimeter to 12" or dig footings to the frost line so the slab doesn't heave and crack in winter.
- Required approvals to line up
• Zoning review (impervious-coverage limit, setback) • Building permit if over exempt sqft or supporting a structure • Pre-pour inspection (forms, base, rebar) in most jurisdictions Call your local building department to confirm which of these apply in your jurisdiction — requirements vary city to city.
Rules vary by city and county — always confirm with your local building department. Estimates only, not a permit determination.
Plan it. Price it. Build it.
Enter your own dimensions and get this same plan for your yard — plus the build guide, permit packet and printable PDFs.
Start my concrete slab